The Complete Guide: How to Recover Lost GPS Location Data on Exported Photos
If your exported photo lost GPS location data, you are dealing with a common EXIF problem. The file may still look fine, but the hidden location metadata can disappear during transfer, export, or compression.
This matters when a photo is used for legal or insurance proof, site reporting, or field documentation. In those cases, a missing geotag can weaken the value of the image.
In this guide, we will show why location data disappears, how to check whether it is truly gone, and how to reconstruct the coordinates so you can restore them in a permanent visual format.
Table of Contents
Quick Answer: Can You Recover Lost GPS Data?
If the GPS EXIF data has been stripped from a photo, it usually cannot be pulled back from the image file itself. The practical solution is to reconstruct the coordinates from timestamps, map history, or the original uncompressed file, then restore the location permanently with a visual GPS stamp.
Why Did My Photo Lose Its Location Data?
To understand how to recover lost data, you first need to understand how it disappeared. Digital photos store hidden metadata called EXIF data (Exchangeable Image File Format). This can include camera details, capture time, and the GPS coordinates of where the photo was taken.
However, EXIF data is fragile. It can be stripped during transfers, uploads, or exports. The most common causes are:
- Social Media and Messaging Apps: If a photo is sent through WhatsApp, Facebook Messenger, Slack, or Instagram, the platform may strip EXIF data to reduce embedded metadata and protect privacy.
- Improper Export Settings: Editing tools such as Lightroom or Photoshop can remove metadata if export settings are configured to reduce file size or omit location info.
- Cloud Storage Conversions: Moving files between services or converting formats, such as HEIC to JPEG, can sometimes remove metadata fields.
- Location Services Disabled: If the camera app did not have location permission when the photo was taken, GPS data was never recorded in the first place.
Step 1: Verify If the Data is Truly Lost
Before assuming the data is gone, check whether it is simply hidden by the viewer you are using.
How to Check for Missing GPS Data
On a Windows PC:
1. Right-click the image file.
2. Select Properties.
3. Open the Details tab.
4. Scroll down to the GPS section. If there are no latitude and longitude values listed, the data is missing.
On a Mac:
1. Open the photo in the native Preview app.
2. Press Command + I to open the Inspector tool.
3. Click the More Info (i) tab and look for the GPS tab. If the GPS tab does not exist, the image has no location data.
If the EXIF data is completely wiped, you cannot extract it from the file itself. You can still reconstruct it from other evidence.
Step 2: The Reconstructive Recovery Method
If the photo was stripped of its data during a transfer, your goal is to recover the coordinates through secondary sources and then restore them in a visible format.
Cross-Reference with Google Maps Timeline
If you or the original photographer had Location History enabled, you may be able to match the timestamp of the image with the exact place shown in Google Maps Timeline.
- Check the photo’s timestamp, which often survives transfer better than GPS data.
- Open Google Maps Timeline for that date.
- Match the time the photo was taken with your route or stop on the map.
- Drop a pin to capture the latitude and longitude coordinates.
Retrieve the Uncompressed Original
If the photo was sent via WhatsApp or a similar app, the original file on the sender’s device may still contain the EXIF data. Ask for the original file through email, Google Drive, or WhatsApp’s Send as Document option, which usually preserves metadata better than a normal image upload.
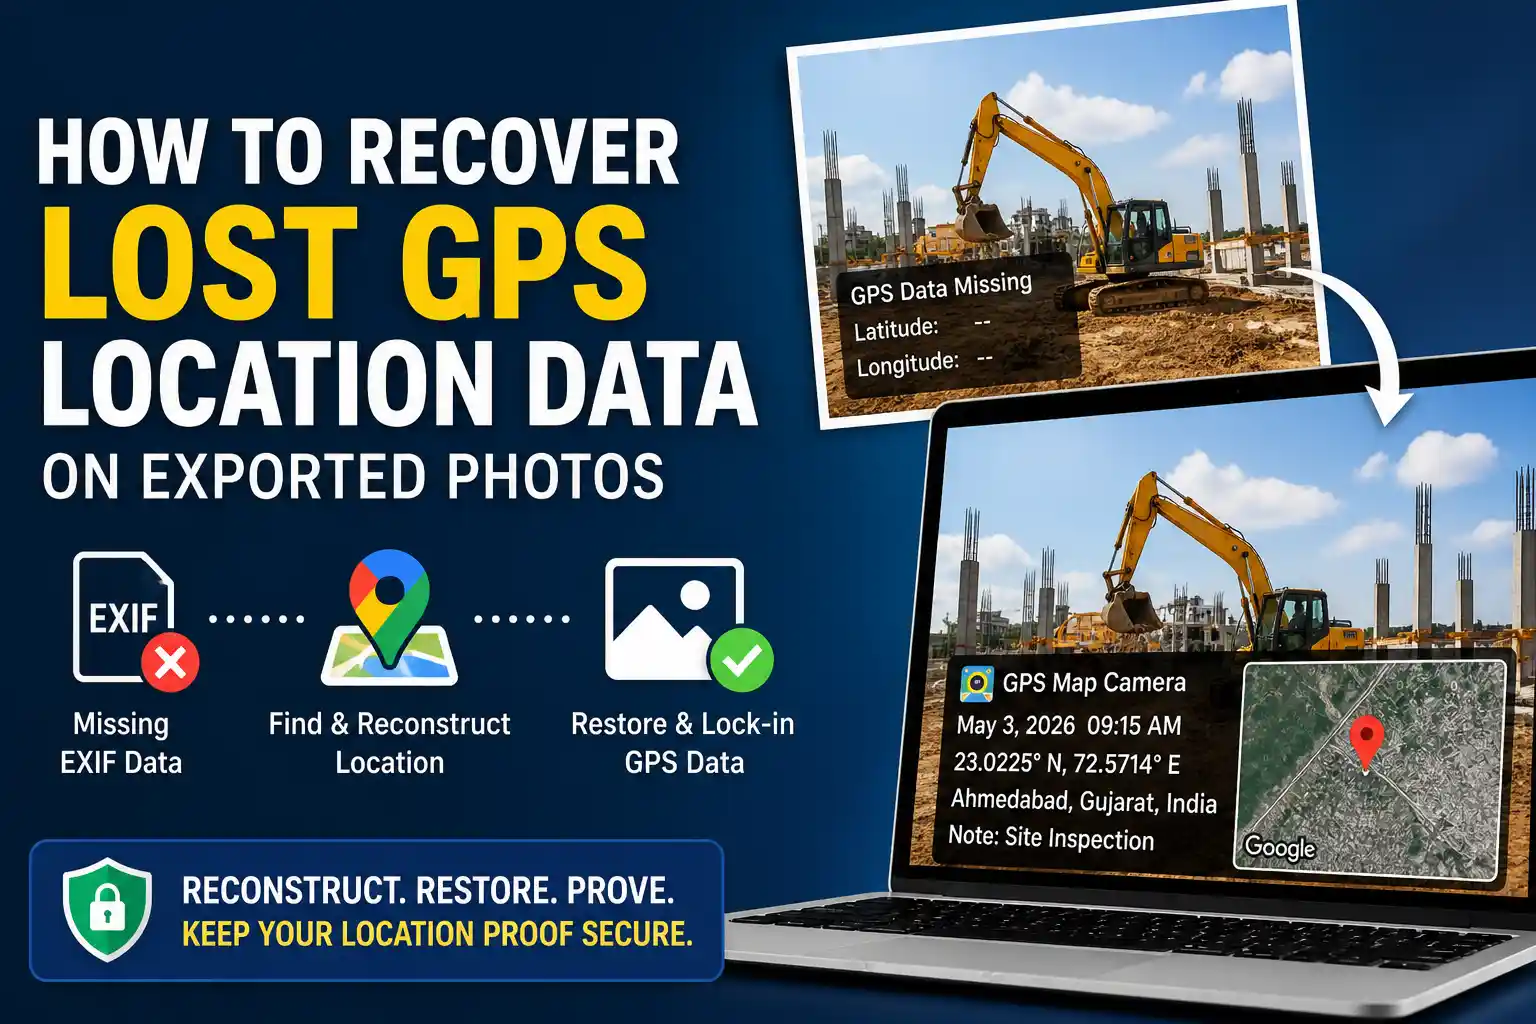
Step 3: How to Restore and Lock-In Your GPS Data
Once you have recovered the correct location, make it permanent by placing the coordinates and map stamp directly on the photo.
Relying only on hidden EXIF data is risky because it can disappear again during the next transfer. The safer workflow is to edit the GPS location on the photo and burn the map and timestamp into the image itself.
Here is the workflow for restoring lost location data using a browser tool:
- Open your Browser: Go to our web-based GPS camera editor. The photo stays in your browser during processing.
- Upload the Stripped Photo: Add the exported image that is missing its GPS data.
- Edit the Location: Enter the coordinates you recovered from Google Maps Timeline or another source.
- Customize the Stamp: Add the correct date, time, address, and map style.
- Export the Stamped Image: Download the new file with visible location proof.
⚡ Restore Location Data Without Extra Software
Upload the photo, add the correct coordinates, and save a stamped image in seconds. For quicker edits, you can also use our guide to add GPS location to photo online.
By burning the location onto the image as a visual watermark, the proof becomes part of the pixels. That makes it much harder to lose in future transfers or uploads.
Best Practices for the Future
To avoid recovering lost location data later, build a better workflow for field photos now:
- Audit Your Camera Settings: Make sure your camera app has location permission enabled when you need geotags.
- Change Your Transfer Habits: Use cloud drives or original file sharing instead of social apps when the image must preserve metadata.
- Adopt a Privacy-First Stamping Workflow: Use privacy-first geotagging tools when you need a permanent location record for inspections, reports, or proof.
Frequently Asked Questions (FAQ)
Add or Restore GPS Stamps Instantly
Do not let missing EXIF data weaken your documentation. Use our free browser-based tool to visually stamp accurate locations directly onto your existing photos.
Open Free GPS Editor Now